Creating a digital moodboard step by step
June 23, 2021
Widely used in creative work, a moodboard is a very practical tool to visualize and define any project. Surely the term sounds familiar to you, but do you know in depth how it works and how it can help you? In this article we delve into this practice and teach you how to easily create one in a digital version.
- What is a moodboard?
- Parts of a moodboard
- How to create a digital moodboard step by step
- Practical applications
What is a moodboard?
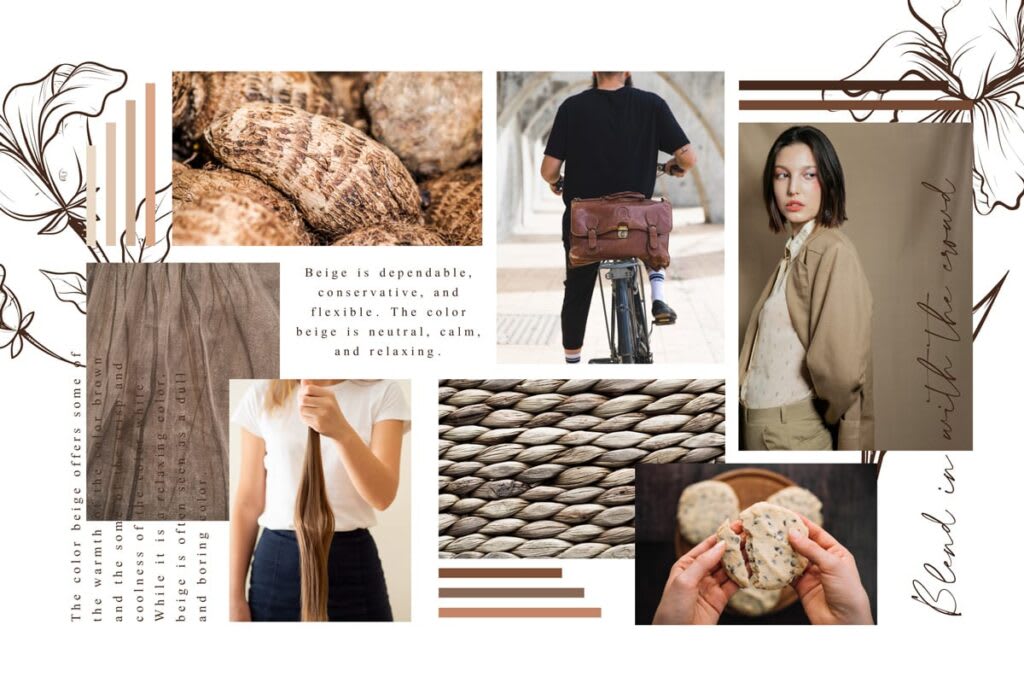
Also called an inspiration board, it is a set of images, materials and textures. Visually represents the style guide of a brand or product. This format combines the emotional and the rational, since sensations that are difficult to explain in any other way are transmitted.
It is very useful to do it when we have already worked on the strategy and/or branding of the project, just before starting the graphic development. Although it also serves in the conceptualization phase as a design thinking tool.
In short, a moodboard is a tool that helps you visualize and direct a project, to be clear about what its visual or perceptual character will be.

Parts of a moodboard
Color
You can include color samples. This is the most emotional part of the entire moodboard, since the colors send direct sensations to our brain. If you are interested in this topic, you can delve deeper into color psychology.
Images
The gaze is usually directed at them, so they are a very important element within the moodboard. Since this is internal work material, there should be no problem using copyrighted images. We live in the world of images, so you know where to find them: Pinterest, Instagram, Google... Of course, you can also use your own photographs.
Textures
This component is largely forgotten in most moodboards, however, including it can make a big qualitative difference in the final result. The easiest way is to think about materials that reflect the character of the project you are working on and look for images of that material. This way you will get interesting textures. You won't be able to touch them in the case of the digital moodboard, but they will provide a very interesting sensory extra.
Typography
We usually include images that contain typography in our moodboards since we use them mainly for graphic design work. This helps us direct typographic decisions, testing and discarding various options to show them to the client. If you work in another creative field, it is possible that you do not need this component, or that you do not control its expressive capacity too much.
How to create a digital moodboard step by step
The great moodboarding experts always prefer the creation of physical moodboards, and they are right. Being able to touch the materials and see the composition live is much more attractive and provides extra information to the receiver.
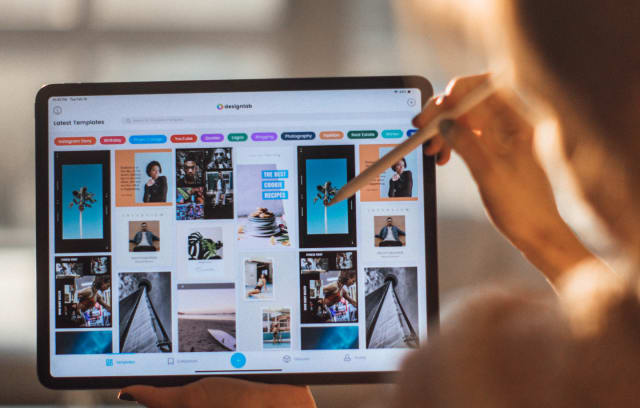
However, for most people it is much easier to make digital moodboards, since you do not need to have real materials and samples on hand (or accumulate them at home). It is more convenient to assemble and you can send it immediately to your client or collaborator. For this reason, now we are going to explain how you can create your digital moodboard step by step.
1. The concept
First of all and most important: you have to have a clear idea of what you are going to do. The moodboard is a great thinking tool through trial and error, and will help you finish defining your ideas. Even so, it is essential that you have previously worked on the concept of the project you will work on, what its keywords are, its strategic orientation, audience and functionality. This way it will be much easier to limit the direction of the moodboard and ensure that the result is coherent.
2. Choose a platform or program
To make your digital moodboard, you will need to choose a program or digital platform that allows it. Here we leave you some ideas:
Pinterest
The platform for saving images par excellence. You will find all kinds of creative disciplines and inspiring images of all kinds. You can share a secret board with more people, making it very practical for teamwork.
Adobe Illustrator or Adobe InDesign
Professional design programs, it is necessary to know them and have some practice to be able to use them. Both are the most complete tool for this and other graphic work, but they are not for everyone.
Canva
The "Illustrator for non-designers." Thanks to its popularity and easy use, it is a program widely used by hobbyists and people who need to generate graphics quickly and do it themselves. It has predefined templates that make it even easier for you.
Miro
This is a very interesting design thinking tool with many exercise templates to work on your business strategy from various points of view. Its "infinite canvas" also allows you to create moodboards.
You can combine several of these tools and try until you find the best one for you. In our case, we used Pinterest to collect references as a team and then assembled the final composition in Illustrator.
Figma
A very useful design tool for designers… and non-designers. Its accessible and intuitive interface will allow you to quickly learn how to use it without the need for many tutorials.
It has a paid version but you also have a free version available.
3. Image Search
Once you are clear about the concept you are going to work on and the platform where you will do it, it is time to get started!
We leave you some ideas to collect interesting material. Think that your surroundings are full of textures and colors that can be useful to you, but in this case you will have to photograph or scan them with good quality to be able to use them in your digital moodboard.
Online platforms:
- Google images
- Tumblr
- Free copyright image platforms: Unsplash, Pixabay or Pexels
To find material to scan:
- DIY stores
- Decoration stores
- Florists
- Catalogs of household objects
- Journals
- Paint and material samples
- Plant and mineral stores
- Fabric stores
And of course, you can take photos or samples to scan around you: your house, a park you usually walk through, the streets of your city... Get inspired everywhere!
4. Combination and selection
Once you have a few images selected, you can start placing them on the "board." This step is very important in creating the moodboard, since the placement and final selection of images can totally improve or worsen the result.
Take this point as a process of trial and error, place the images, move them, change their location. Try different options until the whole is harmonious and coherent. Here are some tips to keep in mind:
- Play with the sizes.
- You can overlay images, but don't go overboard. We recommend that you be careful so that the main images do not cancel each other out.
- Take into account negative spaces, that is, the spaces left between elements. They are very important to achieve a balanced composition.
- You can choose several colors, but it is recommended to restrict the range to a maximum of three, which can be expanded with several shades.
- Use your keywords when selecting images, they will be of great help.
- The format can be vertical, horizontal or square, it is your choice. Keep in mind that depending on the format of the images you use, one or the other will look better.
- Consider the possibility that the background is not white. It is the most common and works with almost everything, but, depending on the project, a gray or black background can add something extra.
Before ending the moodboard always, always!, delete something. It is normal that we collect images that do not ultimately enter the final composition. Putting too many things is a very common mistake that usually lowers the quality of the final result considerably.
To moodboard is a process that helps you close ideas that you have in mind, so we are going to add and discard new possibilities as we go. Better concise and coherent than a chaos of references that are not sufficiently related to each other.
5. Export
Depending on the tools you used to create it, the export will be carried out in one way or another, but it is usually a similar process in all programs.
The best way to save a moodboard is in high-quality pdf or png format (with a resolution equal to or greater than 300dpi). This way you can save it as a digital file and it will also be suitable for printing. Another option is to save two PDFs, one of lower quality to be sent comfortably by email, and the highest quality one perfect for going to the printer.
We recommend that you always keep the original editable file in case you want to make changes in the future.

Practical applications
Personal use
It can be of great help to define your own project. It allows you to express yourself in a very easy way and within everyone's reach.
Co-creation tool
If you work as a team, moodboarding is a quick way to put ideas and feelings in common, transmitting them to others without the need for words. Very useful, especially in creative fields, although it can be applied, with variations, to arrange almost any proposal.
For your client
As we use it, it helps us agree with the client on a line to follow. We present the moodboard and discuss it together, so that client and professional are aligned. This can save you many hours of modifications and misunderstandings. Furthermore, because it is flexible, it can be reviewed and adjusted before reaching the final result.
Ask a designer
If you have your own company or are thinking of starting a business, do not hesitate to try this route. It will be very useful to visualize your ideas, but also to show your designer the spirit and tone you have in mind. This will give you many clues and you can discuss it together to finish defining what graphic line your company will have. We assure you that it will make the work of both parties much easier.

Pinterest for brand positioning
readThe Best Museum Logos: Analyzing Visual Identity in the Cultural Sector
read